Upload Documents
On this page, you can upload all accompanying documents for the order. After uploading, it's necessary to specify which containers the file belongs to and what type of document it is.
Actions
Throughout the section, you can use the following actions using the action icons described below:
| You can upload a file using the action button. | |
| If multiple documents are selected using the checkbox, you can use this action icon to delete them in bulk. | |
| Action icon for deleting already uploaded files. After selecting this option, a confirmation popup follows. |
| Checkbox used to select a specific container. | |
| Checkbox - selected container. | |
| Action icon to specify the type of the uploaded document and assign it to a container. | |
| Action icon for bulk specification of the uploaded document type and assignment to containers. |
Adding Documents
On the left side of the File Upload section, there is a list of attachments that you have already uploaded for the specific order. Using the action icon ![]() , it is necessary to select the type of document and to which container it belongs. If there is only one container in the order, you only need to select the type of uploaded document.
, it is necessary to select the type of document and to which container it belongs. If there is only one container in the order, you only need to select the type of uploaded document.
Only documents with supported file extensions can be added: .xls, .xlsx, .csv, .txt, .htm, .html, .pdf, .ods, .doc, .docx, .rtf, .odt, .jpeg, .jpg, .tiff, .png, .gif.
The maximum size of a single file must not exceed 5 MB.
If you select multiple files at once using the checkbox icon ![]() , you can perform bulk selection of document types and specify for which containers the files belong through the action icon
, you can perform bulk selection of document types and specify for which containers the files belong through the action icon ![]() .
.
When selecting multiple document types for one file, the selection will be recorded as a MIX value. ![]()
When selecting multiple containers for one file, the containers will be listed out. ![]()
The bottom part contains a zone for document insertion. Files can be added by simply dragging and dropping from your computer/email into the document insertion zone.
By dragging and dropping, you can collectively add up to 10 files.
Files can also be added one by one using an action icon![]() , followed by a pop-up window to select the path to the document on the computer.
, followed by a pop-up window to select the path to the document on the computer.
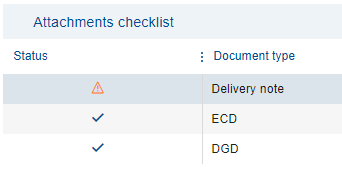
Attachments checklist
On the right side of the Upload Files tab is the Attachments checklist, where documents necessary for carrying out the shipment are listed based on the filled-in information. Upon selecting the type of uploaded document, the icon in the Status column also changes. Additionally, it's possible to add documents that are not required. These will also appear in the checklist after uploading.
