Empty Container Move - Transport Chain
Empty Container Takeover
In this section, you need to fill in the details for picking up the empty container:
Terminal – select the terminal for picking up the container. The field contains a drop-down function.
Owner - select the owner from whose stock the container will be picked up at the terminal. The field includes a drop-down function.
Container will be taken from - select via toggle button from which place/vehicle will be empty container picked up. If none of the options are selected, an error message will appear in a popup notification after the SAVE action with the text "No transport mode selected". This field is mandatory.
Depot - the empty container is located in the depot at the given terminal.
Ship - the empty container will be delivered to the pickup location by ship. When selected, the fields "Ship Name" and "ETA" are activated.
Truck - the empty container will be delivered to the pickup location by truck.
Train - the empty container will be delivered to the pickup location by train.
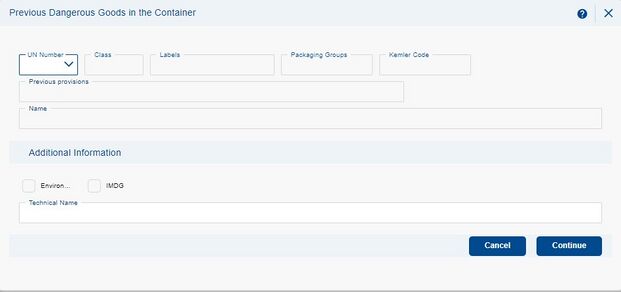
Residues of dangerous goods - Enter the UN number if there is residue from the previous transport of dangerous goods in the empty container (only applicable for containers of type tk, tg).ETA – Date of the ship's arrival at the terminal (displayed if the option Takeover from Ship is checked). The date must be earlier than the requested departure date.
Available From – select the date from which it is possible to take over the container(s) at the chosen terminal. (Displayed if the option Takeover from Ship is not checked). The date must be earlier than the requested departure date.
Required Departure Date – select the date when you want to send the container(s) by train from the chosen terminal. Our customer service will strive to adhere to your chosen departure date, however, we reserve the right to change the date according to the current situation. The requested date must not be earlier than or the same day as the ETA / Available From date.
Note – you can fill in a note for METRANS CS for container pickup.
If the container is not located at the terminal but is available for pickup at a different address, check the option "Takeover from Specific Address". Then, you need to fill in:
Place Name – fill in the name of the stop.
Street, Street Number, Street 2, City, Postal Code, Country – enter the address of the pickup location.
Note – you can fill in additional information for container pickup.
Contacts - via the action icon
you can add a contact person and their details. To send messages from the system, it is necessary to fill in the e-mail field. An existing contact can be selected using the
action icon
.
Residues of dangerous goods - Enter the UN number if there is residue from the previous transport of dangerous goods in the empty container (only applicable for containers of type tk, tg).
Empty Container Handover
Define the terminal/place for handing over the empty container.
Terminal – select the terminal where the empty container is to be handed over. The field contains a drop-down function.
Turn-in reference - reference for turning in the container at the specified terminal.
Owner - select the owner for whom the container will be returned. The field includes a drop-down function.
Container will be handed over to - select the means by which the container will be handed over to the terminal using the toggle switch. If no option is selected, an error message will be displayed in a pop-up notification after the SAVE action, stating "Transportation mode not selected". This field is mandatory.
Depot – the container will be placed into the stock of the selected shipping company at the chosen terminal. There must be pre-notification issued by the shipping company.
Ship – the container will be shipped by sea from the place of delivery. It is also necessary to fill in the fields: Ship Name, Closing and ETS, Transhipment port, and Destination Port.
- Ship Name – select the ship. If the ship is not in the offer, contact CS METRANS. The field contains a drop-down function.
- ETS – estimated date of ship departure from the port. The date must be older than or equal to the closing.
- Closing date – date for the latest delivery of the container to the port for the given ship. The date must be younger than or equal to the ETS.
- Closing time – specify the time for the ship's closing.
- Earliest Arrival – define the earliest time the container can be delivered to the terminal. This is a non-binding and optional information. The date must be earlier than the ETS and closing.
- Transhipment port – specify the ship's transshipment port on the way to the destination port. Required for the Bremerhaven/Koper port if the TCC number request field is checked.
- Destination port – define the ship's destination port. Required when the TCC number request option is enabled.
Truck – The container will be picked up from the place of delivery by truck. The fields Ship Name, closing, and ETS, transshipment port, and destination port become inactive.
Train – The container will be picked up from the place of delivery by truck. The fields Ship Name, closing, and ETS, transshipment port, and destination port become inactive.
TCC number request – – only for the delivery of the container at the port of Koper. This is a pre-notification to the port system.
If placing the container outside the terminal at a specific address is required, check the option Handover to a specific address". Then it is necessary to fill in:
Place Name – fill in the name of the stop.
Street, House Number, Street 2, City, ZIP Code, Country – fill in the address of the pickup location.
Note – you can provide additional information for the container pickup.
Contacts - via the action icon
you can add a contact person and their details. To send messages from the system, it is necessary to fill in the e-mail field. An existing contact can be selected using the
action icon
.
Return of TANK/BULK to METRANS Depot
If a tank or bulk container is transported, it must not be returned to the depot at the METRANS terminal with remnants of hazardous goods. The application will alert the user to such a situation with an error notification, and the depot field will display an error icon ![]() .
.
The user can resolve the mentioned error in three ways:
- Adding another stop with the Cleaning station in the transport chain.
- Changing the depot to a terminal other than METRANS.
- Unchecking the Hazardous goods residue field (only if actually transporting SAFE goods).
Selecting, filtering individual containers and copying their data
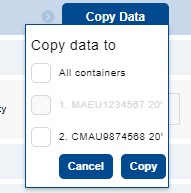
The header of the transport chain contains an overview of all containers entered in the Header and containers section. The overview is used to select the container for which we want to fill in the transport data. The application allows data to be filled in only for one selected container at a time. If we want to enter the same data for other containers, it is necessary to use the button ![]() .
.
When copying data, the source container is already selected and marked in gray ![]() . The data from this container will be copied to the containers you have chosen. You can select the target containers by checking the designated boxes
. The data from this container will be copied to the containers you have chosen. You can select the target containers by checking the designated boxes ![]() .
.
To filter containers, use the drop-down menu on the left side of the container panel. Keep in mind that you are filling in data for only one selected container. The selected container is indicated by a light blue background.
If not all containers are visible in the panel, the gray icon ![]() is activated and you can scroll with
is activated and you can scroll with ![]() .
.
Action Icons and Functions of the Transport Chain
Throughout the card, actions can be applied to individual sections using action icons described below:
Left Side:
![]() - action icon for the function Drag and drop. Individual sections of the transport chain can be moved or reordered using this function.
- action icon for the function Drag and drop. Individual sections of the transport chain can be moved or reordered using this function.
![]() - with the help of arrows, individual sections in the transport chain can be moved chronologically, or their order can be changed.
- with the help of arrows, individual sections in the transport chain can be moved chronologically, or their order can be changed.
Right Side:
![]() - action icon for adding individual stops in the transport chain. The following types of stops can be added:
- action icon for adding individual stops in the transport chain. The following types of stops can be added:
![]() Transit terminal (Transit terminal cannot be entered as the last point of transport)
Transit terminal (Transit terminal cannot be entered as the last point of transport)
Terminal – select the transit terminal. The field contains a drop-down function.
Note - you can enter additional information for METRANS customer service.
Trucking from this terminal – by selecting the transit terminal and checking this box, container delivery by truck will be carried out from this terminal (note: it may not be the cheapest option for the given transport).
Cleaning station - it is necessary to select from the prepared list. The field contains a drop-down function.
Note - you can enter additional information for METRANS customer service.
Contacts - You can add a contact person and their details via the action icon
. To send messages from the system, it is necessary to fill in the email field. Using the action icon
, you can select an existing contact.
Place Type - Select the type of stop - Weighing / Other stop.
Place name - fill in the name of the next stop.
Street, House Number, Street 2, City, ZIP Code, Country - filling in the address for the given stop.
Note - additional information for the stop location.
Contacts - via the action icon
you can add a contact person and their details. To send messages from the system, it is necessary to fill in the e-mail field. An existing contact can be selected using the
action icon
.

